 Save
Save My brother showed up unannounced one Sunday, starving after a long drive, and I had almost nothing ready. I threw together these pizza rolls with what was in the fridge, and he ate four in a row without saying a word. When he finally looked up, he just pointed at the pan and asked if I could make a double batch next time. That's when I knew this recipe was a keeper.
I started making these every week after my gym sessions because I was tired of the same boring chicken and rice. The first time I brought a container to share, my workout buddy thought I'd bought them from some fancy protein bakery. She didn't believe me when I said the dough was just yogurt and flour until I sent her the recipe that night.
Ingredients
- Plain Greek yogurt: This is the magic behind the soft, tangy dough, and nonfat works just as well as low fat without sacrificing texture.
- Self rising flour: It gives the dough its lift and keeps things simple, but you can easily make your own if you only have all purpose on hand.
- Egg: Binds the dough together and adds richness, plus a little extra protein never hurts.
- Garlic powder and salt: These season the dough from the inside out so every bite has flavor, not just the filling.
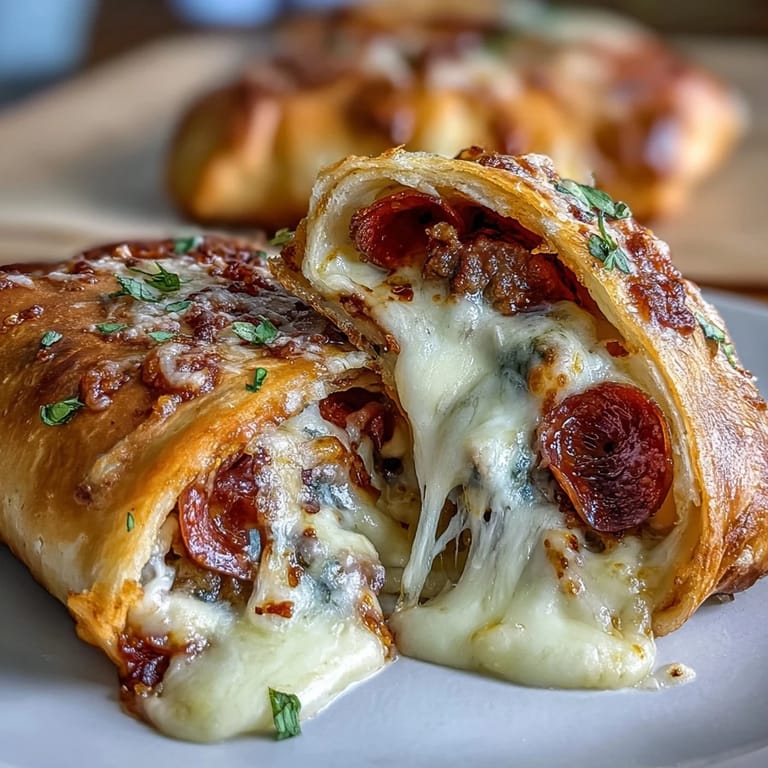
- Lean ground beef: I use the leanest I can find to keep fat low and protein high, and it browns up beautifully with minimal draining.
- Turkey or beef pepperoni: This is where the pizza flavor really shines through, and turkey pepperoni cuts down on extra grease.
- Shredded part skim mozzarella: Melts perfectly and gives you those gooey cheese pulls without overdoing the calories.
- Pizza sauce: Just enough to keep things moist and tangy, but not so much that it makes the rolls soggy.
- Dried Italian herbs: A quick hit of oregano and basil makes the filling taste like it simmered all day.
- Black pepper and crushed red pepper flakes: A little heat balances the richness, and you can skip the flakes if you prefer it mild.
- Olive oil: A light brush before baking gives the tops a golden, crispy finish.
- Grated Parmesan and dried parsley: The final touch that makes them look and taste like they came from a pizzeria.
Tired of Takeout? 🥡
Get 10 meals you can make faster than delivery arrives. Seriously.
One email. No spam. Unsubscribe anytime.
Instructions
- Preheat and prep:
- Set your oven to 400°F and line a baking sheet with parchment so nothing sticks. This step takes seconds but saves you scrubbing later.
- Cook the beef:
- Brown the ground beef in a nonstick skillet over medium heat, breaking it up as it cooks until no pink remains. Drain any excess fat, stir in the pepper and Italian herbs, then set it aside to cool while you make the dough.
- Make the dough:
- Combine Greek yogurt, self rising flour, egg, garlic powder, and salt in a large bowl, mixing until a sticky dough forms. Turn it out onto a lightly floured surface and knead for a few minutes until it smooths out and stops being tacky.
- Roll it out:
- Roll the dough into a rectangle about 12 by 10 inches, keeping the thickness as even as you can. If it springs back, let it rest for a minute and try again.
- Spread the sauce:
- Spread pizza sauce evenly over the dough, leaving a small border around the edges so it doesn't ooze out when you roll. Use the back of a spoon to get it nice and even.
- Add the filling:
- Scatter the cooked beef, pepperoni slices, and mozzarella over the sauce, distributing everything so each roll gets a good mix. Don't pile it too high or the rolls won't seal properly.
- Roll it up:
- Starting from one long edge, roll the dough tightly into a log, keeping the filling tucked in as you go. Pinch the seam gently to seal it.
- Slice into rolls:
- Use a sharp knife to cut the log into 12 equal pieces, wiping the blade between cuts if it gets sticky. Arrange them cut side up on your prepared baking sheet with a little space between each one.
- Brush and top:
- Brush the tops lightly with olive oil, then sprinkle with Parmesan and dried parsley or herbs. This is what gives them that irresistible golden crust.
- Bake until golden:
- Bake for 18 to 22 minutes, or until the tops are golden brown and the cheese is bubbling. Let them cool for a few minutes before diving in so you don't burn your mouth on molten cheese.
 Save
Save I made a triple batch of these for a potluck at work, and they disappeared so fast I didn't even get one for myself. Three different people asked for the recipe before lunch was over, and one coworker told me she'd been trying to find a high protein snack her kids would actually eat. Turns out, pizza rolls are the universal language.
How to Store and Reheat
These rolls keep in an airtight container in the fridge for up to four days, and they reheat beautifully in the oven or microwave. I like to pop them in a 350°F oven for about eight minutes to crisp them back up, but the microwave works in a pinch if you're in a hurry. For longer storage, freeze them in a single layer on a baking sheet until solid, then transfer to a freezer bag and they'll keep for up to three months.
Customizing Your Rolls
You can swap the ground beef for turkey or chicken if you want even leaner protein, or go vegetarian with sautéed mushrooms and bell peppers. I've also added a handful of fresh spinach to the filling and it worked perfectly without making things watery. If you like a little kick, double the red pepper flakes or toss in some sliced jalapeños before rolling.
Serving Suggestions
These rolls are fantastic on their own, but I love serving them with a side of marinara or ranch for dipping. They pair really well with a simple green salad or some roasted veggies if you want to round out the meal. I've even packed them cold in lunchboxes and they still taste great at room temperature.
- Serve warm with extra pizza sauce or garlic butter for dipping.
- Pack them in meal prep containers with carrot sticks and hummus for a balanced lunch.
- Freeze a batch and reheat straight from frozen for an instant high protein snack anytime.
 Save
Save Every time I pull a fresh batch out of the oven, the smell takes me right back to that Sunday with my brother, and I'm reminded that the best recipes are the ones born out of necessity and a little creativity. Make these once and I guarantee they'll become part of your regular rotation.
Recipe FAQs
- → Can I use regular flour instead of self-rising flour?
Yes. For every cup of all-purpose flour, add 1½ teaspoons of baking powder and ¼ teaspoon of salt. This mimics self-rising flour's leavening properties.
- → What makes the dough protein-rich?
Greek yogurt provides approximately 20g of protein per cup, combined with the egg and flour's natural protein content. The beef and cheese filling adds another 10g+ per serving.
- → Can I make these vegetarian?
Absolutely. Substitute the ground beef with plant-based crumbles or extra vegetables like mushrooms and bell peppers. Use vegetarian pepperoni or replace with sliced olives and sun-dried tomatoes.
- → How should I store leftover rolls?
Keep refrigerated in an airtight container for up to 4 days. For longer storage, freeze individually wrapped rolls for up to 3 months. Reheat at 350°F for 8-10 minutes until heated through.
- → Why is my dough too sticky or dry?
Sticky dough needs more flour—add 1 tablespoon at a time while kneading. If too dry, add 1 teaspoon of Greek yogurt or water. Humidity affects flour absorption, so adjust accordingly.
- → Can I prepare these ahead of time?
Yes. Assemble and slice the rolls, then refrigerate on the baking sheet for up to 12 hours before baking. Alternatively, freeze unbaked rolls and bake directly from frozen, adding 3-5 minutes to cooking time.